Thank you for purchasing templates from LandingLayouts. You are awesome! You are entitled to get free lifetime updates to this product + exceptional support from the author directly.

Download The File

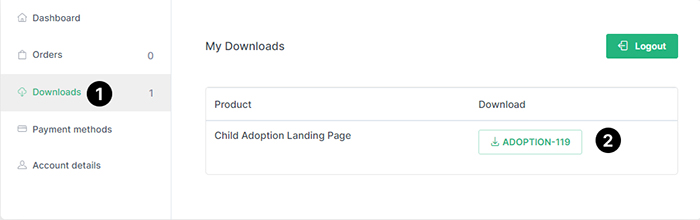
After purchasing template from landinglayouts.com, go to your My Downloads page. You can choose to download the template by clicking on Download button.

Download File From LandingLayouts

Files Included

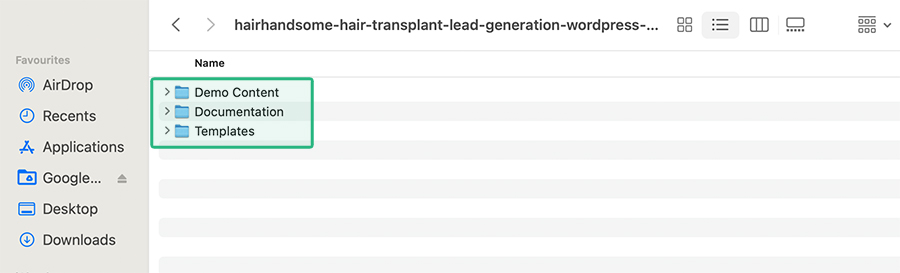
The downloaded file comes at a .zip format. You need to extract the downloaded zip file. After extracing the file, you'll find the following 3 folders.

  1. Demo Content -> This foler containes all the demo files, you have to install them after installing the WordPress theme.
  2. Documentation -> This folder contains the documentation which you are currently reading now.
  3. Templates -> The main file. This folder contains a WordPress theme.
Downloaded File Structure

Theme Installation

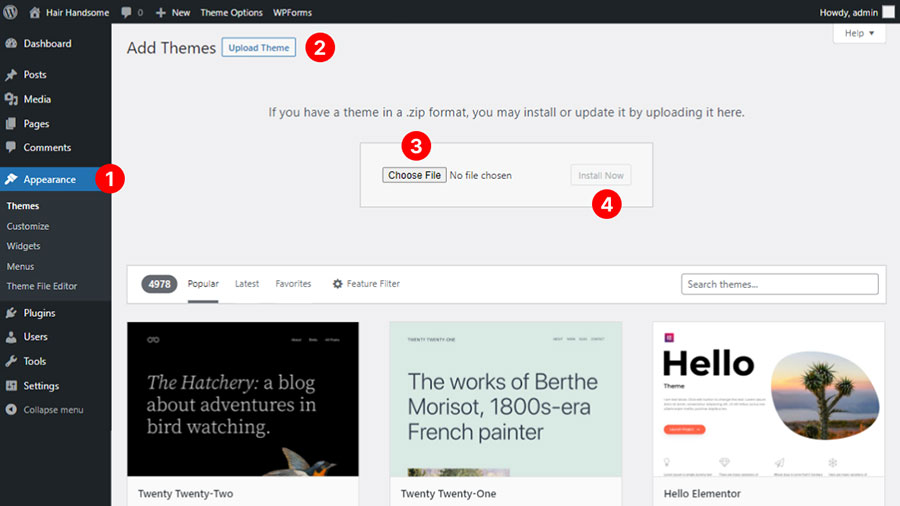
When you are ready to install a theme, you must first upload the theme files and then activate the theme itself. The theme files can be uploaded in two ways:

  • WordPress Upload: Navigate to Appearance -> Themes -> Add New -> Upload. Go to browse, and select the theme.zip zipped theme folder. Hit "Install Now" and then "Activate" and the theme will be uploaded and installed. Recommended
  • FTP Upload: Using your FTP client, upload the non-zipped theme folder into the /wp-content/themes/ directory on your server.
Install Theme
Install Theme

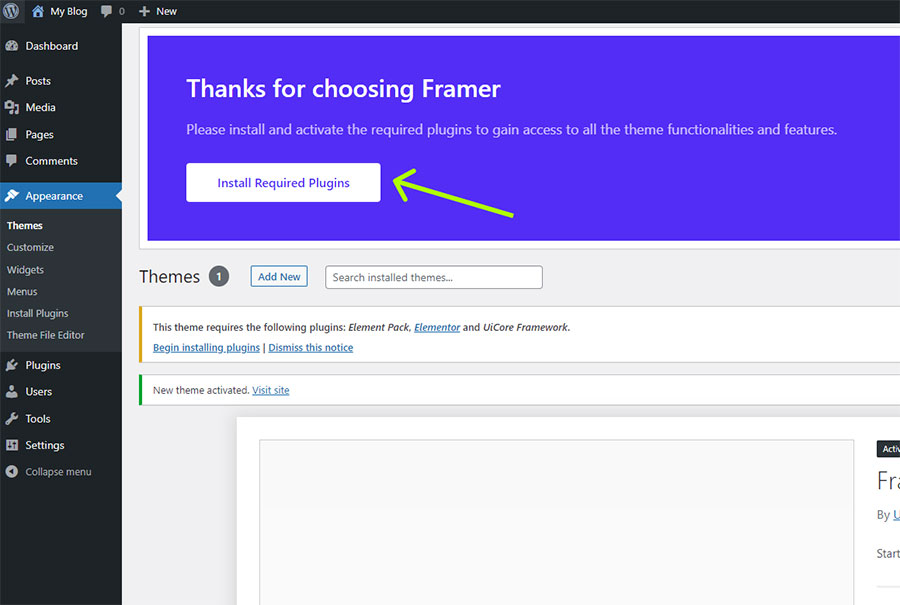
Once the theme is installed, please click on Install Required Plugins button.

Install Required Plugins

Now you are ready to go to next step that is Import Demo.

Importing Demo Contents

You can easily import all the demo content and features by following below steps carefully:

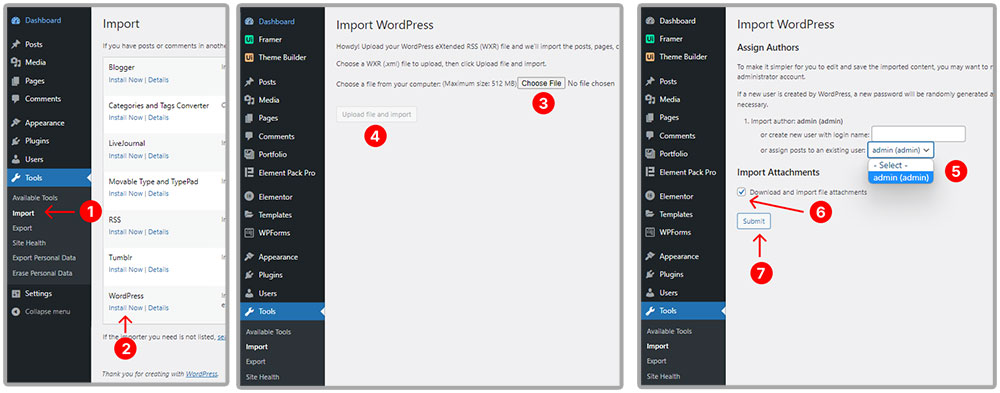
1. Importing xml file:

  • Navigate to Tools -> Import -> WordPress -> Run Importer [You may not see Run importer button becasue of the WordPress Importer is not installed, you can just simply click on Install Now and then you will see the Run Importer button].
  • Click on Choose File/Upload Button then select "Content.xml" file and click on "Upload file and import".
  • You will see "Assign Authors" options. just select your existing user by selecting form the dropdown. Also, please tick on "Download and import file attachments" and then click on Submit button.
Import Content.xml
Import Demo Content Step 01 (Import Content.xml)

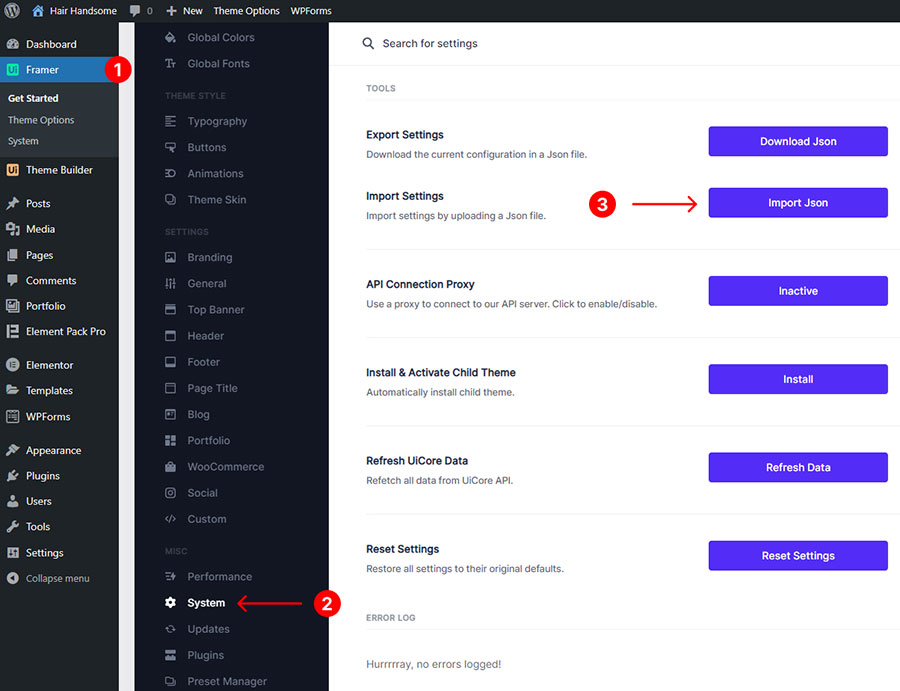
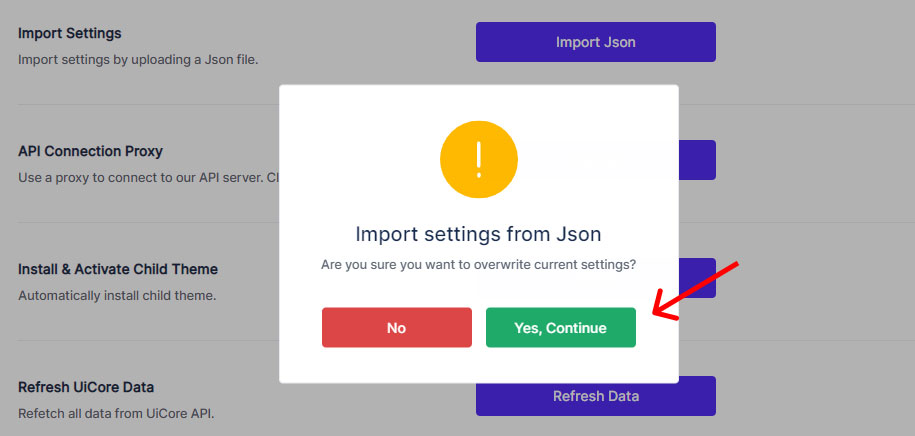
2. Importing theme settings:
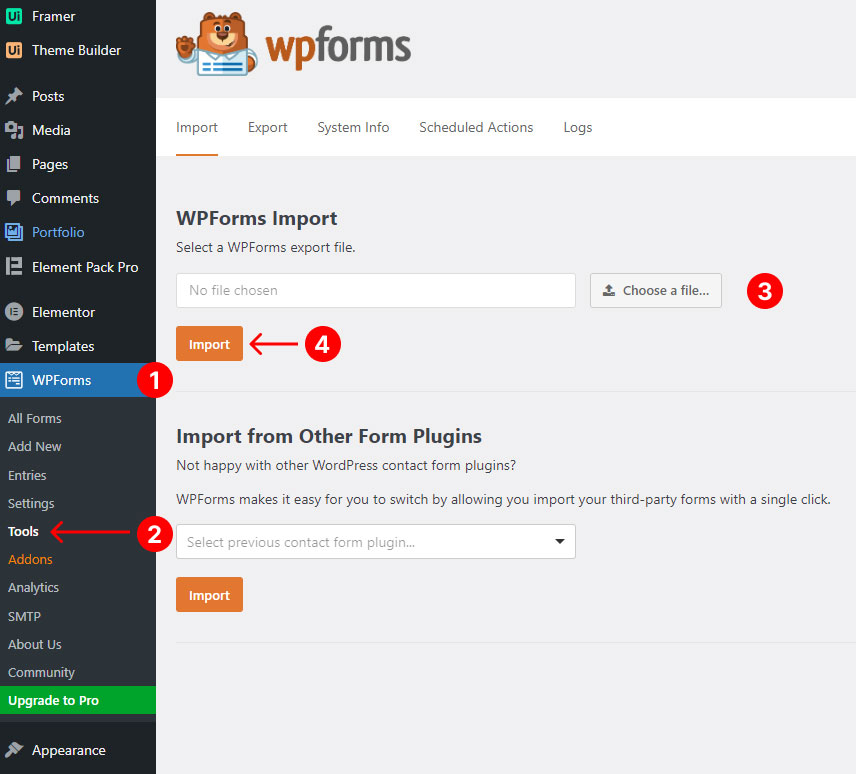
  • Navigate to Framer -> System -> Import Settings. Then click on Import Json and select the Settings.json file and click on "Yes, Continue" button.
Import Settings.json Import Settings.json
Import Demo Content Step 02 (Import Settings.json)

2. Importing Forms:

  • Navigate to Plugins -> Add New. Then search WPForms in the search bar, then install and activate it.
  • Now, Navigate to WPForms -> Tools -> Import. Then at the "WPForms Import" section click on "Choose file" and select the "wpforms.json" file and click on Import button.
Import wpforms.json
Import Demo Content Step 03 (Import wpforms.json)

You have successfully imported the demo content. Now jump on the next and final step.

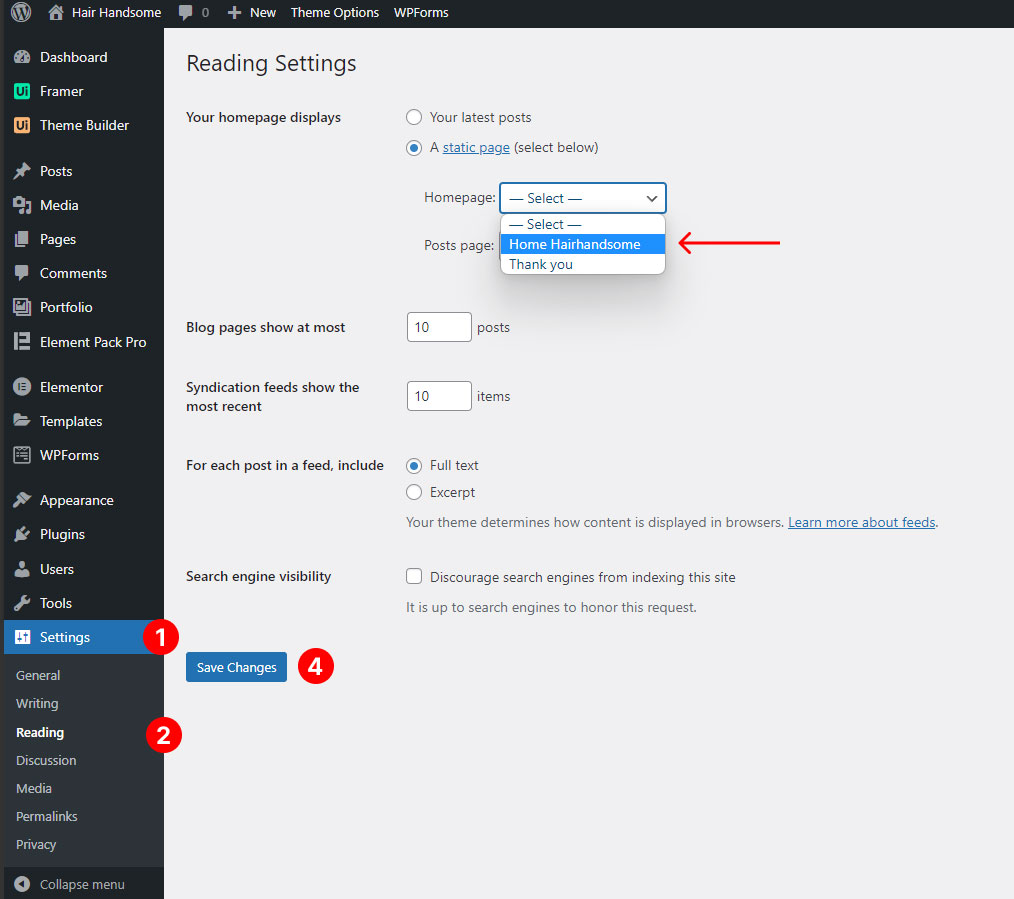
Note: After Importing the WPForms please check Home page if the form is not showing then you have to manually put the shortcode.

Final Step:

  • Navigate to Settings -> Reading. Then at the Your homepage displays section click on A static page (select below) then select Homeform the dropdown and as your Homepage and click on the Save Changes button.
Set Homepage
Set Homepage

Congratulations! Your site is live, jump on the next step to learn how you can start customizing your website.


Basic Site Settings

Change Logo & Favicon

To update the logo please navigate to Framer -> Branding -> update Primary Logo and Favicon.
* For best preview quality on HiDPI screens, the recommended image size 3x the actual size. E.g., for a 120x30px logo, upload an image size of 360x90px. * Favicon images you can upload ico/png image size of 32x32px

Change Logo & Favicon

Global Color & Typography

To change the Global color please navigate to Framer -> Global Colors.

Change Global Colors

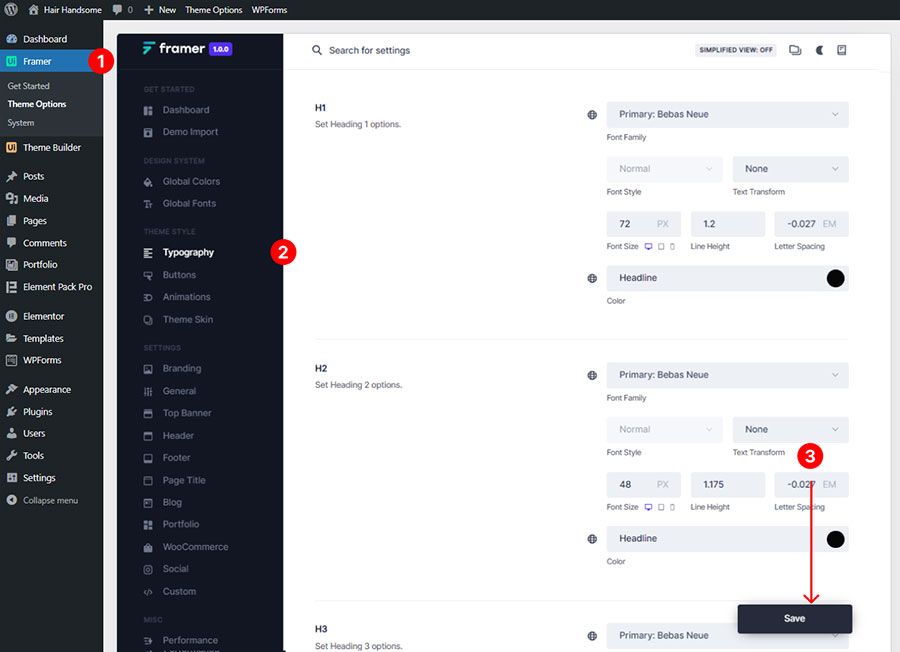
To change the Typography please navigate to Framer -> Typography.

Typography Settings
Typography Settings

Change Global Font

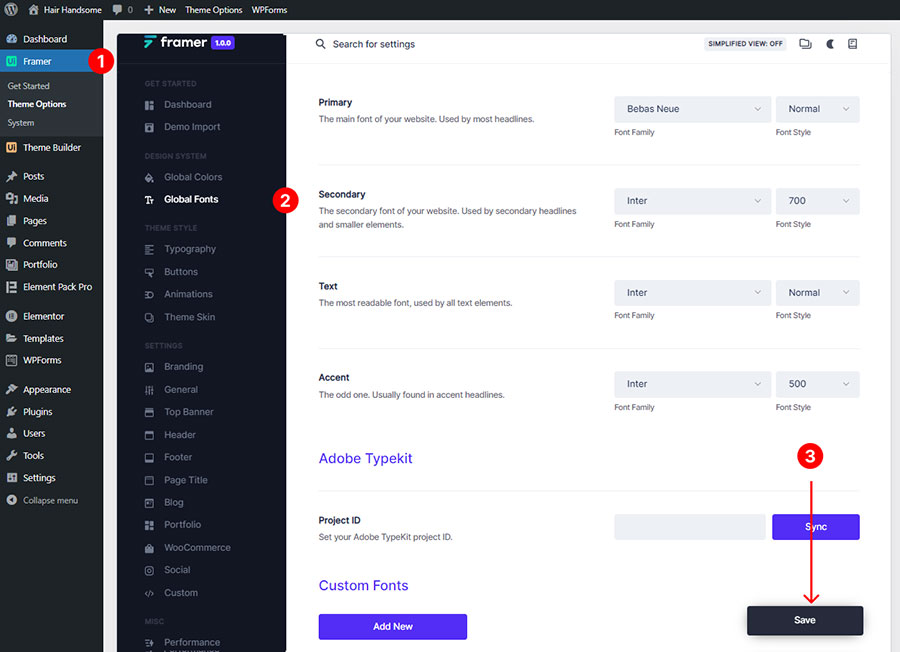
To change the Global font style please navigate to Framer -> Global Fonts.

Global Font Settings

Contact Form

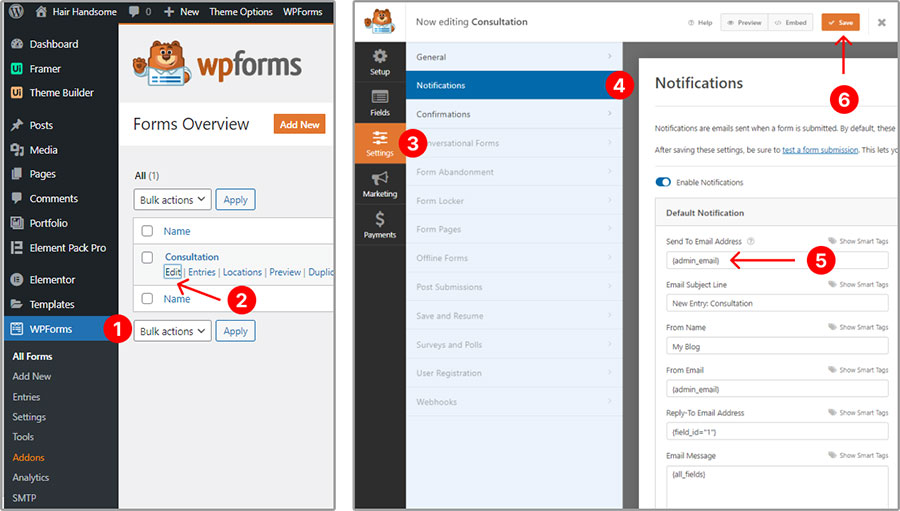
To modify the contact form email settings, please navigate to WPForms -> Edit Form -> Settings -> Notifications -> Send To Email Address then add the email address where you want to recevie all submission data, you can contact us if you have any confusion.

Update Contact Form Email

Support

Thank you for purchasing our template. We are happy that you are one of our customers. If you come up with any template-related questions that are beyond the scope of this documentation file, please feel free to let us know via mail us at landinglayouts@gmail.com. Our support team will reply to you within 2 hours to 24 hours(max).